
DEEP GUIDE · ADVANCED
HWP Generation (@vhwp)
Learn @vhwp drafting, review and fill existing HWP/HWPX template fields, edit tables and pages, and export HWP, HWPX, and PDF.
01. VHWP Document Studio overview
VHWP is a browser-based document studio for opening and authoring HWP 5.x and HWPX files. Generate a draft with AI, rewrite selected passages, finish text, paragraphs, tables, pages, and objects with direct editing tools, then save the document in several formats.
| Goal | Primary feature |
|---|---|
| Start from an empty document | @vhwp alone → blank document and AI panel |
| Draft from a request | @vhwp + document brief → automatic generation |
| Edit an existing document | Open HWP/HWPX → edit in the browser |
| Develop the body | AI generation, advanced insert, and selection rewrite |
| Keep the final version | Save HWP; export HWPX, PDF, or VORA |
02. Start with @vhwp and a launch link
| Chat request | What opens |
|---|---|
| @vhwp | A blank document with the AI panel ready; nothing runs automatically |
| @vhwp + document brief | An editor with the request entered and document generation started automatically |
| @vhwp + HTTPS file URL + writing instruction | An editor that extracts a document, image, or video as background and starts generation |
| @vhwp + HTTPS file URL | An editor that extracts the file and starts generation with a default instruction |
| @vhwp + turn the content above into meeting minutes | An editor that passes the relevant conversation as background and starts generation |
@vhwp is an exact routing trigger, not a word to place in the document. It may appear at the beginning, middle, or end of the sentence, but type it exactly. File input accepts direct HTTPS download URLs for documents such as PDF, DOCX, and HWP; images such as PNG and JPG; and videos such as MP4 and MOV. An ordinary web-page URL is not treated as an attachment.
03. Temporary links and browser binding
An editor link is valid for one hour by default and binds to the first browser profile that opens it. Refreshing, reopening, and using another tab in that browser are allowed, but another browser, device, or private window may be rejected.
- Continue working in the browser that claimed the link first.
- If the link expires or another browser is blocked, request a new link in VORA chat.
- Automatic generation is protected from running twice after a refresh.
- Save locally or to VORA before the link expires.
04. Editor layout
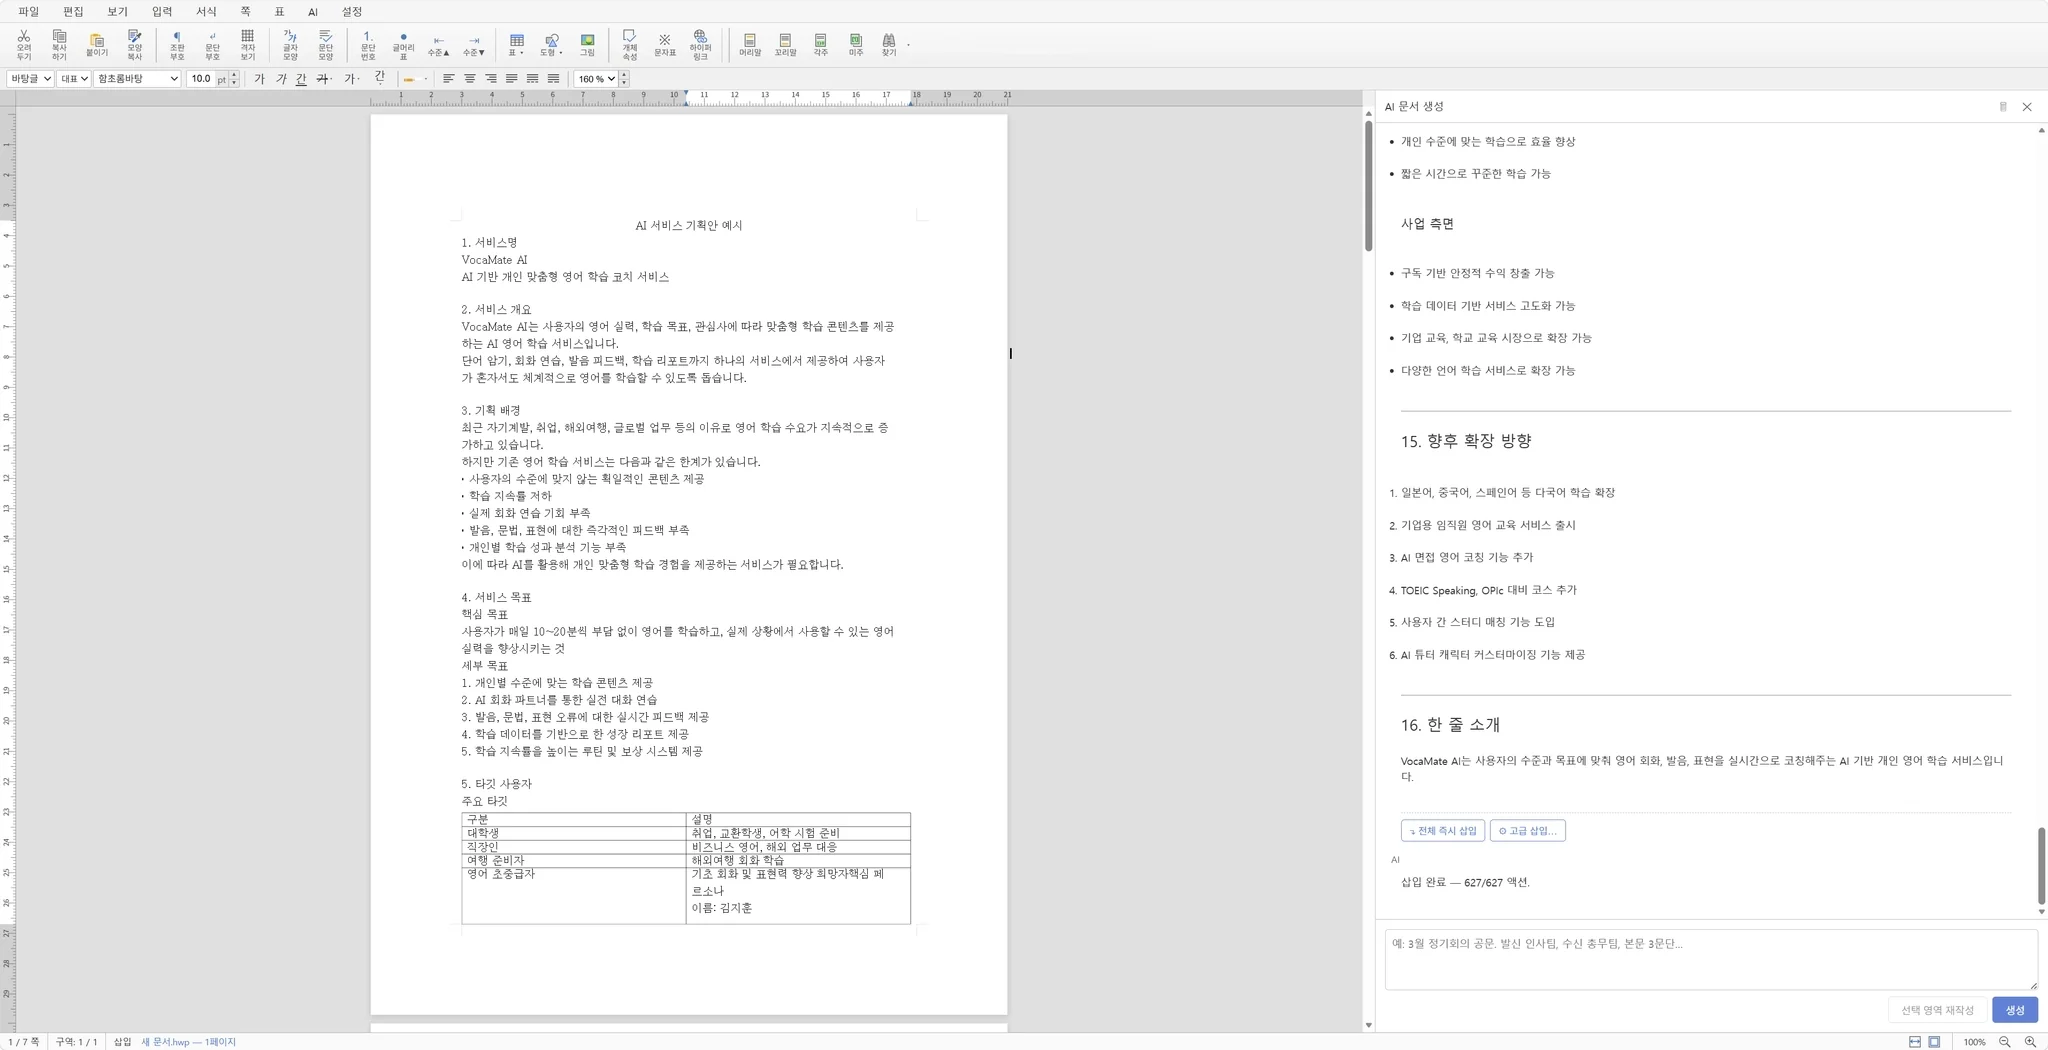
| Area | Purpose |
|---|---|
| Top menu and toolbars | File, Edit, View, Insert, Format, Page, Table, AI, and Settings |
| Center document | Direct selection and editing of page text, tables, pictures, and objects |
| Right AI panel | Prompts, streamed answers, Insert all now, Advanced insert, and Rewrite |
| Bottom status bar | Page, section, and input state; zoom; save, insert, and error progress |
05. Write a strong document brief
| Element | What to specify |
|---|---|
| Document type | Official letter, minutes, report, business plan, application, and so on |
| Audience and purpose | Recipient, decision maker, learner, and desired action |
| Structure | Outline, chapter count, required sections, tables, and lists |
| Source material | Conversation, references, figures, and as-of date to use |
| Treatment | Language, tone, length, expertise, and terms to preserve |
| Review rules | No guessing, cite sources, leave unknown fields blank, and so on |
Example: “@vhwp Create a five-page board business plan in the order Problem, Solution, Market, Revenue, Quarterly Roadmap, Risks. Use only figures from the conversation above, include two tables, use a formal tone, and mark unverified figures [Verify].”
06. Generate and converse with AI
- Enter the purpose and required content in the AI panel, then select Generate.
- As the answer streams, check the structure, tables, lists, and figures against the brief.
- Use specific follow-up requests in the same conversation to fill gaps.
- When the answer is ready, choose Insert all now or Advanced insert.
AI can receive the current page count, fields, selected text, cursor hint, and a limited portion of document text as context. Clearing chat history starts a new session, so finish follow-ups that depend on earlier answers first.
07. Insert all now and choose a target
Insert all now converts the complete AI answer into HWP elements without another model call. It is the fastest route when you want the answer's Markdown headings, paragraphs, lists, tables, and images as a whole.
| Insert target | Behavior |
|---|---|
| Current position | Insert at the caret |
| Replace selection | Delete the selected text and insert in its place |
| Below current paragraph | Create a paragraph after the current one and insert |
| End of document | Append at the end of the document |
08. Transform a block with Advanced insert
Advanced insert separates an AI answer into headings, paragraphs, tables, lists, images, and other blocks. Choose one block, optionally transform it, and place it at a selected target.
| Preset | Use |
|---|---|
| As is | Insert the selected block without changing its content |
| Summary | Condense the core into no more than one paragraph |
| As table | Restructure data as a two- or three-column table |
| As list | Convert items to a consistent bulleted list |
| Formal | Polish the block in a formal, respectful tone |
09. Template insertion: review and fill form fields
Use template mode for forms with fixed tables and instructions. It identifies writable fields using the existing labels, instructions, and table structure, then lets you review proposed field values before changing the document.
Open the existing HWP or HWPX form and switch Template mode ON in the AI assistant. Provide real submission details and references, then ask: “Preserve field labels and instructions, fill only the blanks, and leave unknown information empty.”
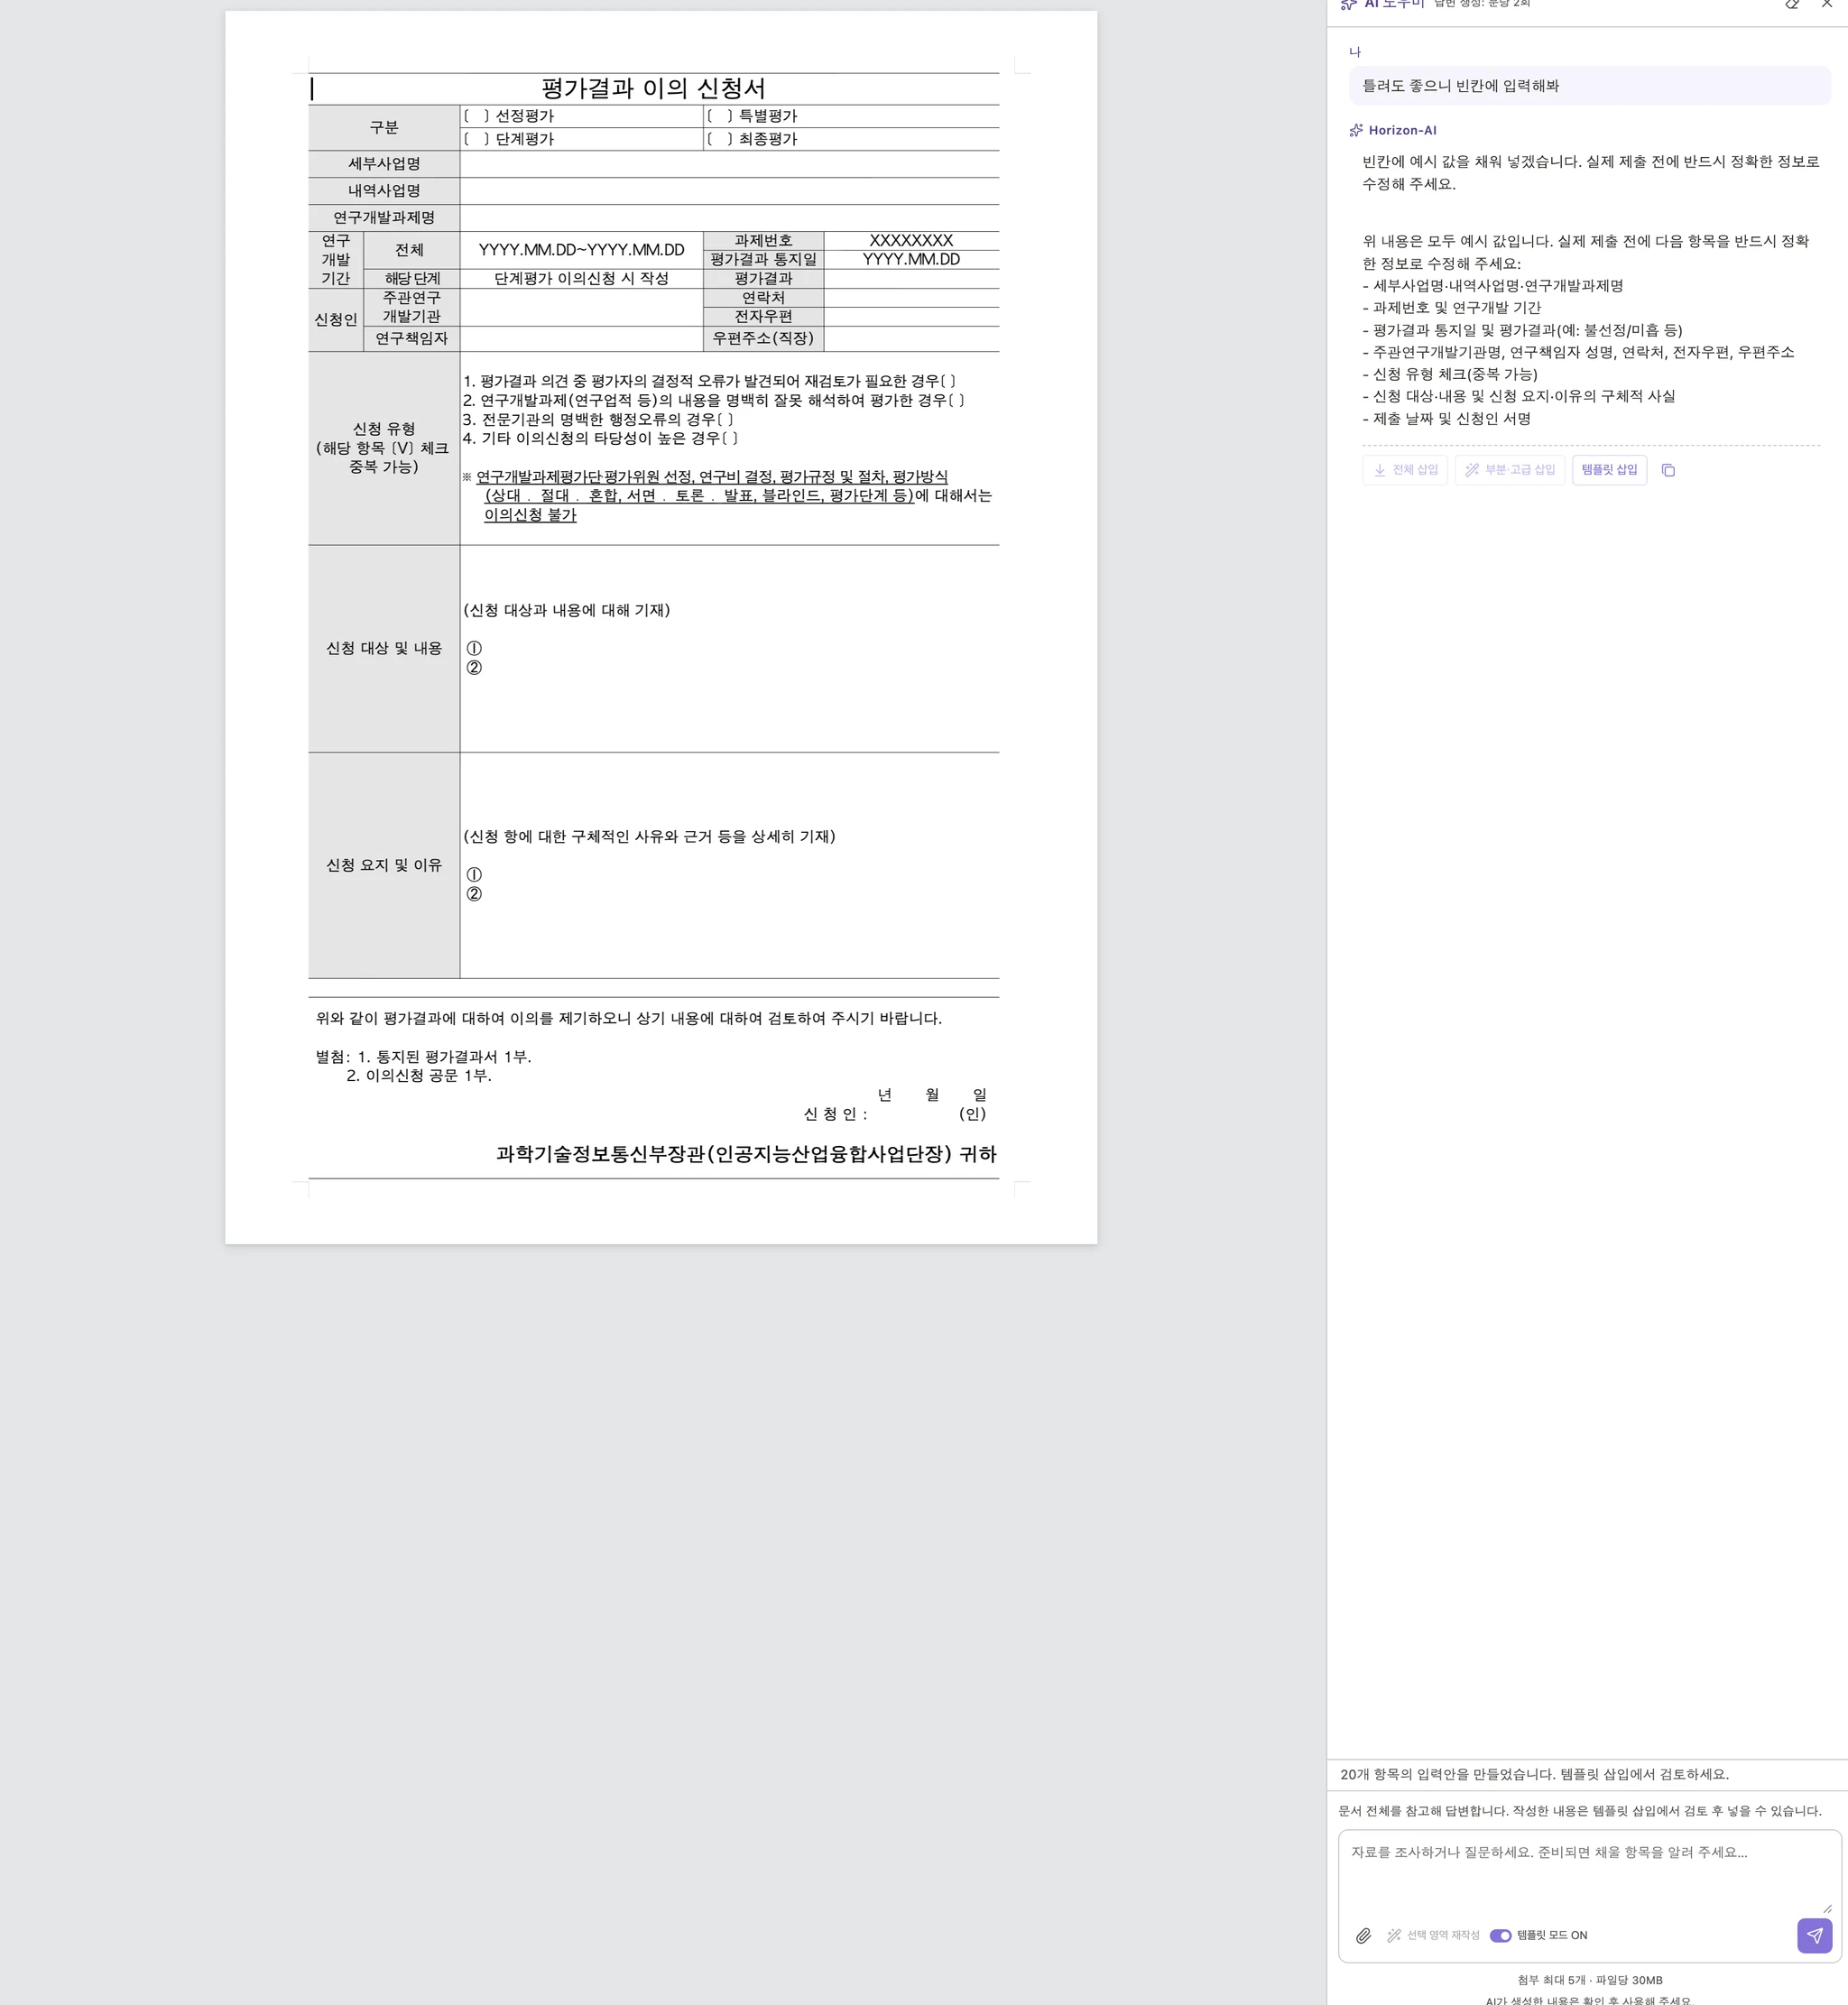
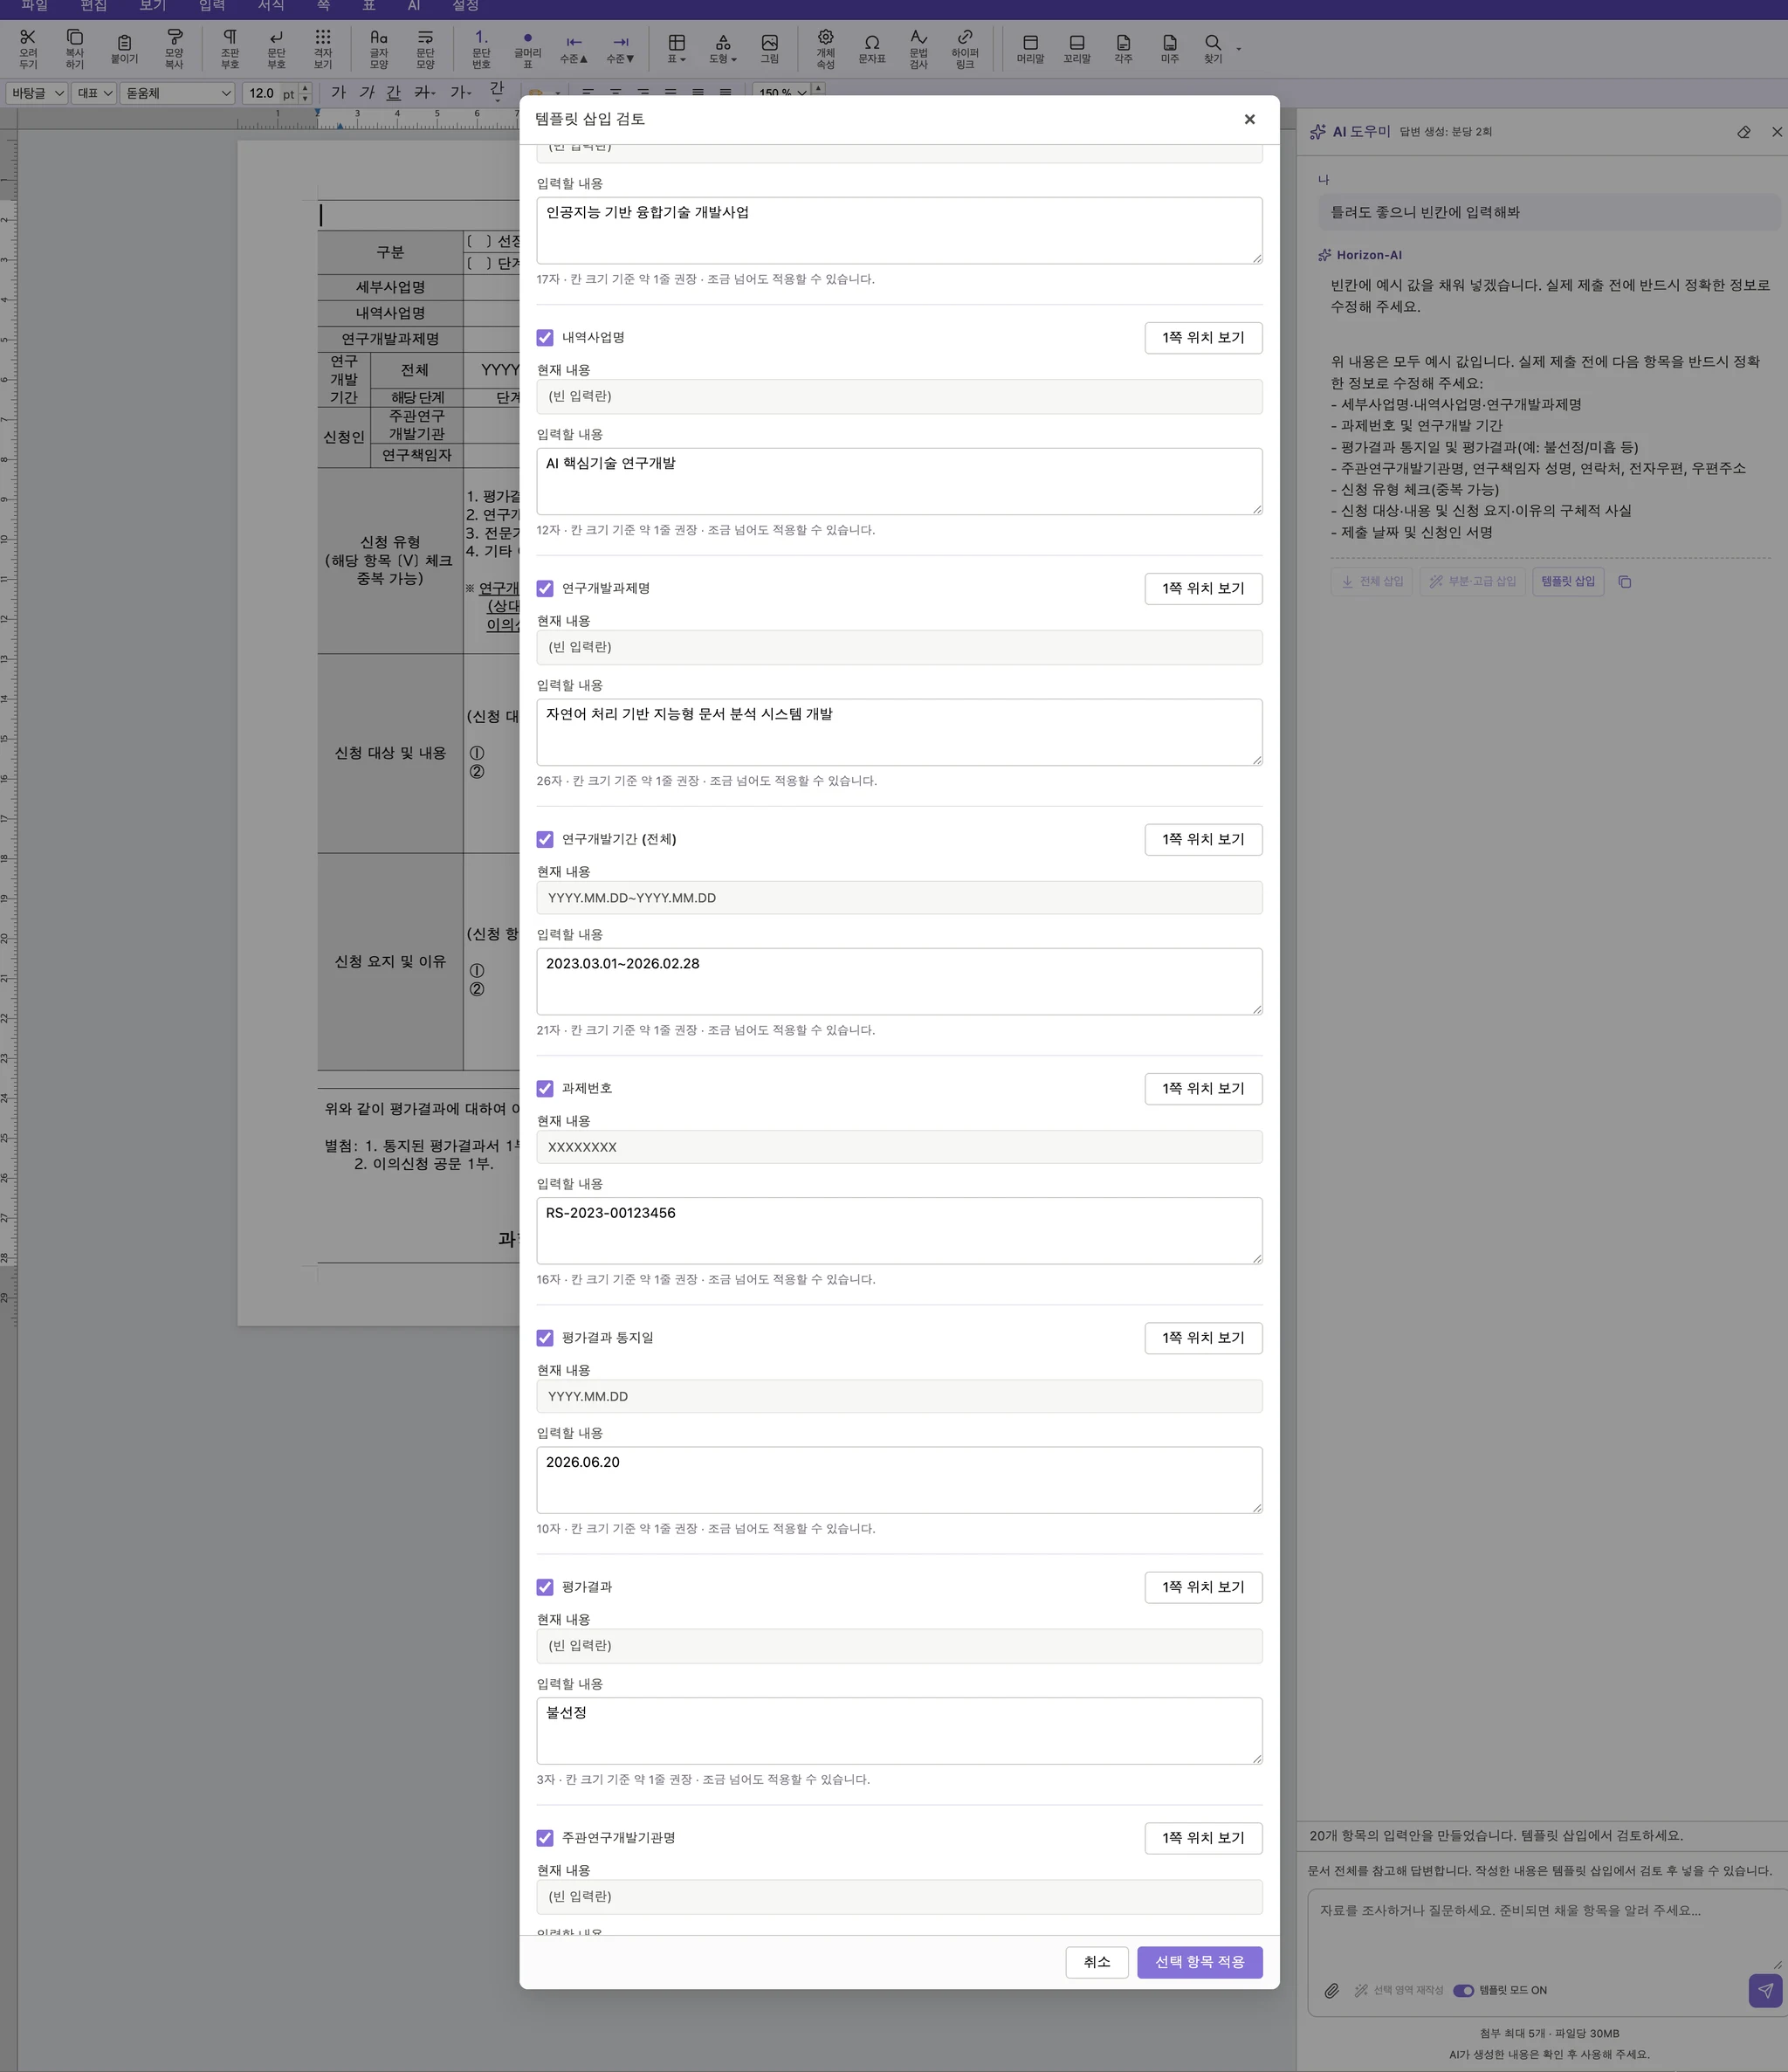
- Select Template insertion under the response to open the review dialog.
- Compare the current and proposed values for each field and edit the proposed text.
- Use View location to check the actual page and field. Uncheck any field you do not want to apply.
- Use the suggested line count to shorten text where needed, then apply the selected fields.
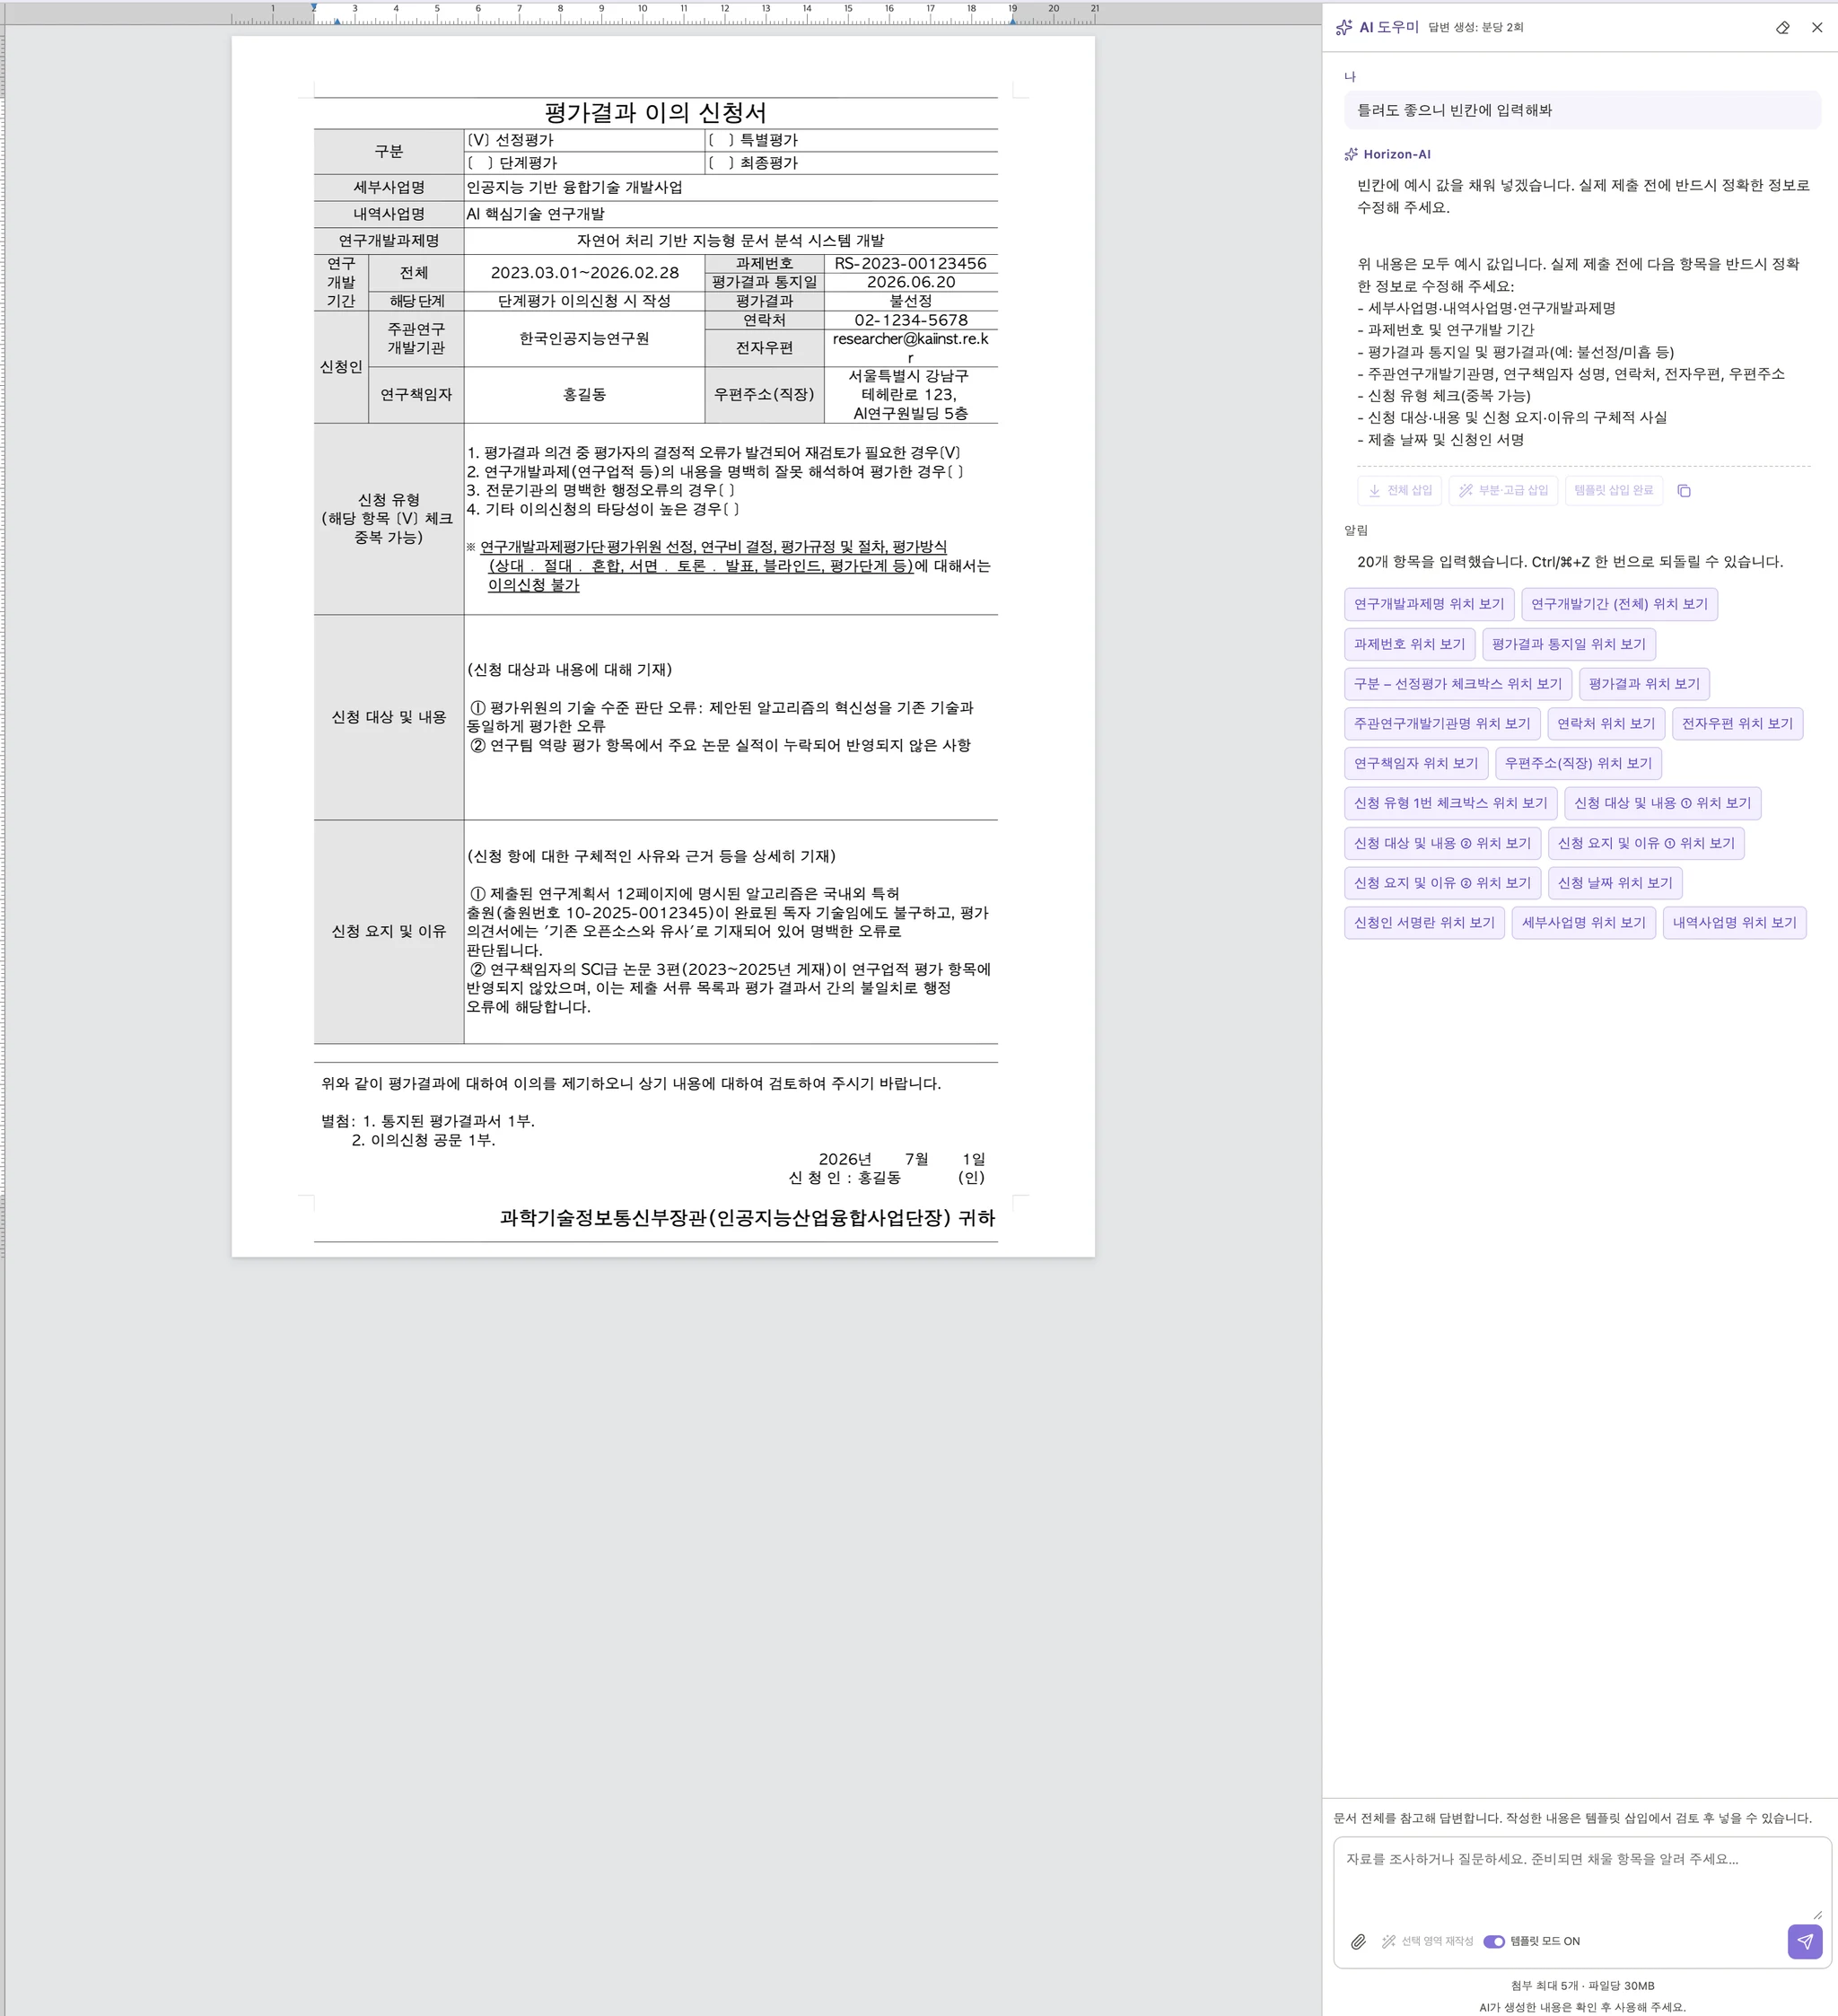
After applying, revisit filled fields with View location. Check numbered markers such as ① and ②, fixed instructions, checkboxes, and table wrapping. One Ctrl/Cmd+Z reverses the entire insertion.
10. Rewrite a selected passage with AI
Select text and open AI Rewrite to choose Summarize, Expand, Formal, Casual, Translate to English, Fix typos, or Polish style, plus an optional instruction. Preview the streamed result before applying or regenerating it.
- Selections may span several body paragraphs within one section.
- Selections may span paragraphs within one table cell, text box, table caption, or the same nested-cell path.
- One Ctrl/Cmd+Z reverses an applied rewrite.
- Paragraph styles are restored, but character formatting such as bold, italic, and color is not reapplied.
11. Open HWP and HWPX documents
Choose File → Open to load an HWP 5.x binary file or HWPX Open XML document. The engine interprets paragraphs, tables, columns, headers and footers, master pages, footnotes and endnotes, text boxes, pictures, captions, equations, and other common structures.
- Make a copy of the source file and open that copy in the editor.
- Check page count, fonts, tables, pictures, and page breaks on first load.
- For a complex document, compare representative pages near the beginning, middle, and end.
- Save under a new name, then reopen the result in the target desktop HWP application.
12. Edit text, paragraphs, and styles
| Scope | Main controls |
|---|---|
| Characters | Font, size, color, bold, italic, underline, strikeout, superscript, and subscript |
| Paragraphs | Alignment, indentation, margins, line spacing, and tab stops |
| Lists | Numbering, bullets, and outline level increase or decrease |
| Styles | Apply and manage styles for consistent headings and body text |
| Special treatments | Emboss, engrave, outline, distribute, and split alignment |
13. Build tables and edit cells
- Create a table, then insert or delete rows above or below and columns on either side.
- Merge several cells or split one cell into rows and columns.
- Use Table/Cell Properties for size, alignment, padding, borders, and background.
- Apply borders and background to each selected cell or as one combined cell.
- Add cell formulas and a table caption.
14. Pictures, shapes, text boxes, equations, and notes
| Element | What you can do |
|---|---|
| Picture | Insert; adjust size, position, crop, and border; rotate, flip, and caption |
| Shape and text box | Place callouts and emphasized content independently of body text |
| Object order | Move forward or backward, bring to front or back, group, and ungroup |
| Equation | Edit fractions, roots, matrices, integrals, sums, and more |
| Footnote, symbol, bookmark | Add supporting notes, special characters, and navigation targets |
| Field | Inspect and edit form placeholders |
15. Paper, sections, columns, headers, and footers
- Use Page Setup to set paper size, orientation, and margins.
- Control content flow with page and column breaks.
- Change part of a document with section settings and multicolumn layout.
- Create headers and footers and insert page number, total pages, and file name fields.
- Hide a header, footer, or selected page element on the current page when needed.
16. Find, navigate, undo, and use shortcuts
| Key | Action | Key | Action |
|---|---|---|---|
| Ctrl/Cmd+Z | Undo | Ctrl/Cmd+Shift+Z or Ctrl+Y | Redo |
| Ctrl/Cmd+S | Save HWP | Ctrl/Cmd+P | |
| Ctrl/Cmd+F | Find | Ctrl+F2 | Find and replace |
| Ctrl/Cmd+B, I, U | Bold, italic, underline | Alt+L / Alt+T | Character / paragraph properties |
| Ctrl/Cmd+Enter | Page break | Ctrl/Cmd+Shift+Enter | Column break |
| F6 / F7 | Styles / Page Setup | Ctrl/Cmd + / - / 0 | Zoom in / out / 100% |
Find, Replace, Find again, and Go to make terminology cleanup and navigation faster in a long document. A few alignment actions use Alt+Shift mappings to avoid browser shortcut conflicts.
17. View, validate, and print
- Alternate Fit page, Fit width, and zoom levels to review both structure and fine formatting.
- Show formatting marks, transparent borders, and the grid to inspect hidden breaks and object alignment.
- Line information correction checks paragraph line warnings and recalculates affected paragraphs.
- Use Print Preview to verify physical paper size, page count, margins, and clipping.
18. Save to HWP, HWPX, PDF, or VORA
| Command | Result and use |
|---|---|
| Save | Save an editable HWP (.hwp) file |
| Export (HWPX) | Create an Open XML-based HWPX copy |
| Export (PDF) | Create a fixed-layout sharing or submission PDF; fall back to browser print if the server export fails |
| Export (VORA) | Store HWPX in My AI Creations; an unavailable registration may fall back to a download |
| Output to paper or PDF through the browser print dialog |
For a new document, the editor may suggest a file name from the first text heading and the latest AI prompt. Normal Save on an HWPX source warns that it will create HWP without overwriting the source; use the dedicated HWPX export when you need HWPX.
19. Recommended workflows by document type
| Document | Recommended sequence |
|---|---|
| Official letter or approval form | Open blank or template → set paper and header → AI body draft → check fields and approvals → save HWP/PDF |
| Meeting minutes | Provide context, attendees, and agenda → insert all → tabulate decisions, owners, and deadlines → fact-check |
| Business plan | Specify outline and evidence → generate by chapter → transform tables and lists → unify styles and page numbers → review PDF |
| School report | Specify topic, length, and citation rules → draft → add equations, pictures, and footnotes → check attribution and language |
| Existing form | Open a source copy → check compatibility → edit only required cells and fields → save under a new HWP/HWPX name |
20. Compatibility and final quality review
- Compare headings, names, dates, money, equations, and table totals with the source.
- Check changes in character width, line breaks, and page count caused by font substitution.
- Inspect table clipping, merged cells, picture resolution, captions, and object overlap on every page.
- Check headers, footers, page numbers, footnotes, the table of contents, and unexpected blank pages.
- Open HWP/HWPX in the real submission environment and compare it visually with the PDF.
21. Troubleshooting
| Symptom | What to check |
|---|---|
| @vhwp does not start | Check the exact trigger spelling and send a new message |
| The link will not open | Confirm it is under one hour old and in the first browser profile; request a new link |
| The AI answer will not insert | Check the body caret, supported target, and whether a header, footnote, or cell block is active |
| Rewrite is rejected | Reselect ordinary text within one section or one cell |
| An HWPX source cannot be saved in place | Normal Save creates HWP; use Export (HWPX) for HWPX |
| PDF generation fails | Allow the browser-print fallback and unblock pop-ups |
| Formatting or pagination changes | Check fonts, paper, line correction, and complex objects; review in the target HWP application |